Installation & Setup
How to get Intranet Design 1 — Professional SharePoint Intranet onto your tenant and run the setup wizard for the first time.
Installation Instruction 🔗
- Upload the
spd-intranetdesign1.sppkgfile to your App Catalog - Navigate to your modern SharePoint site.
- Click the Settings (gear) icon → Select “Add an app”
- Choose Intranet Design 1 — Professional SharePoint Intranet
- Click Add
- After installation, go to Site Contents to confirm it's added to the site.
🧪 Free Trial setup Instruction🔗
🧪 Steps to Set Up and Apply Template🔗
Follow the steps below to configure your SharePoint site using the setup wizard:
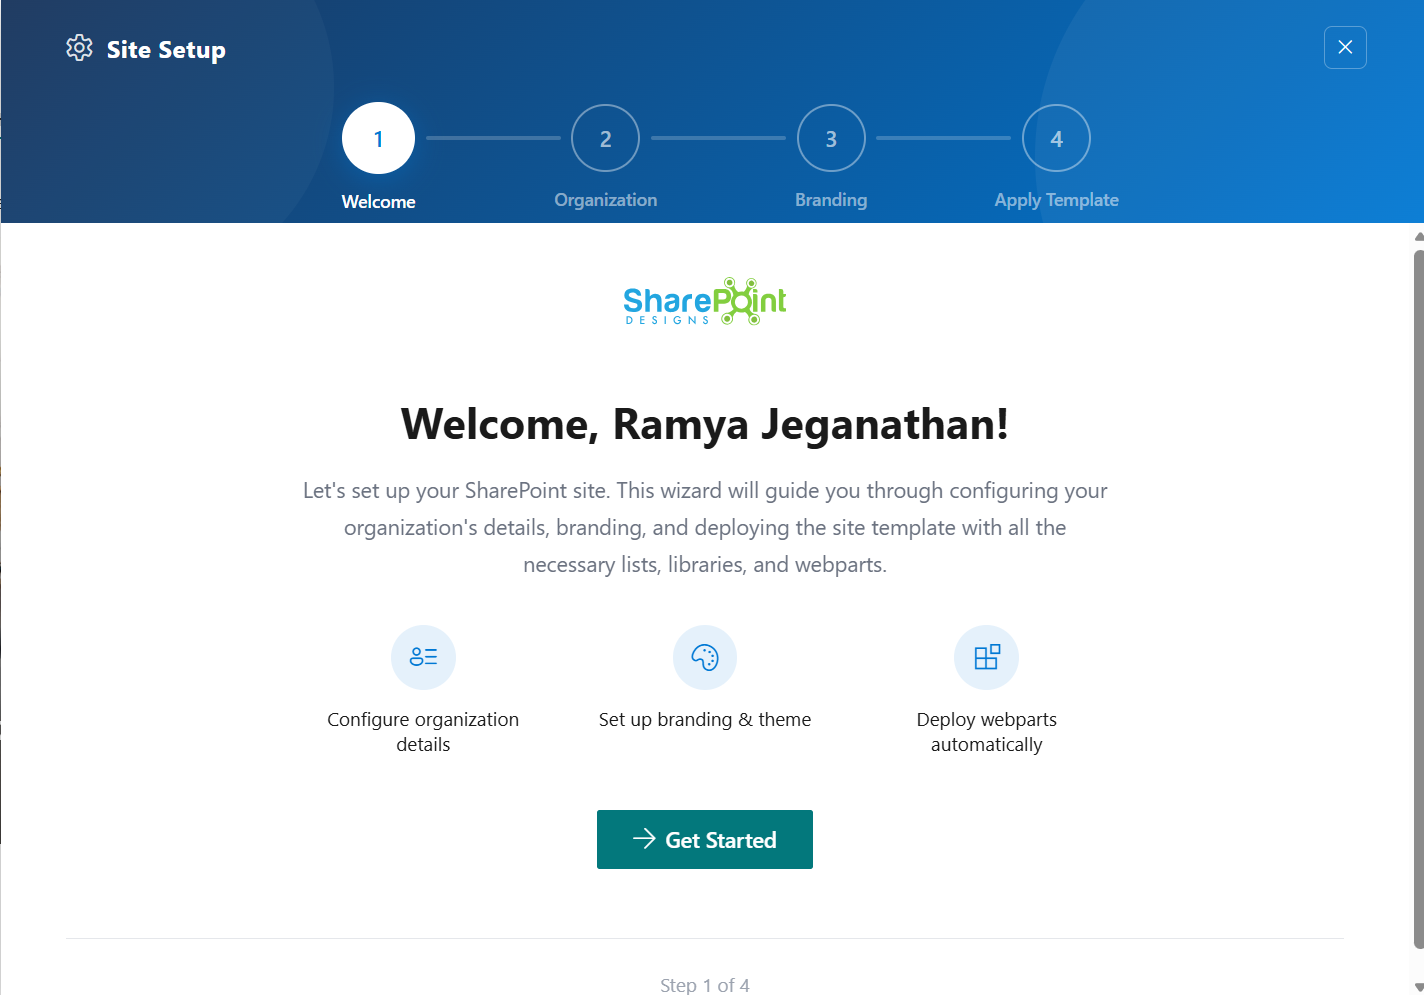
🔹 Step 1: Welcome Screen
- 1Open the Site Setup panel from the top suite bar.
- 2You will land on the Welcome screen.
- 3This screen provides an overview of what will be configured:- Organization details - Branding and theme - Automatic deployment of web parts
- 4Click Get Started to proceed.
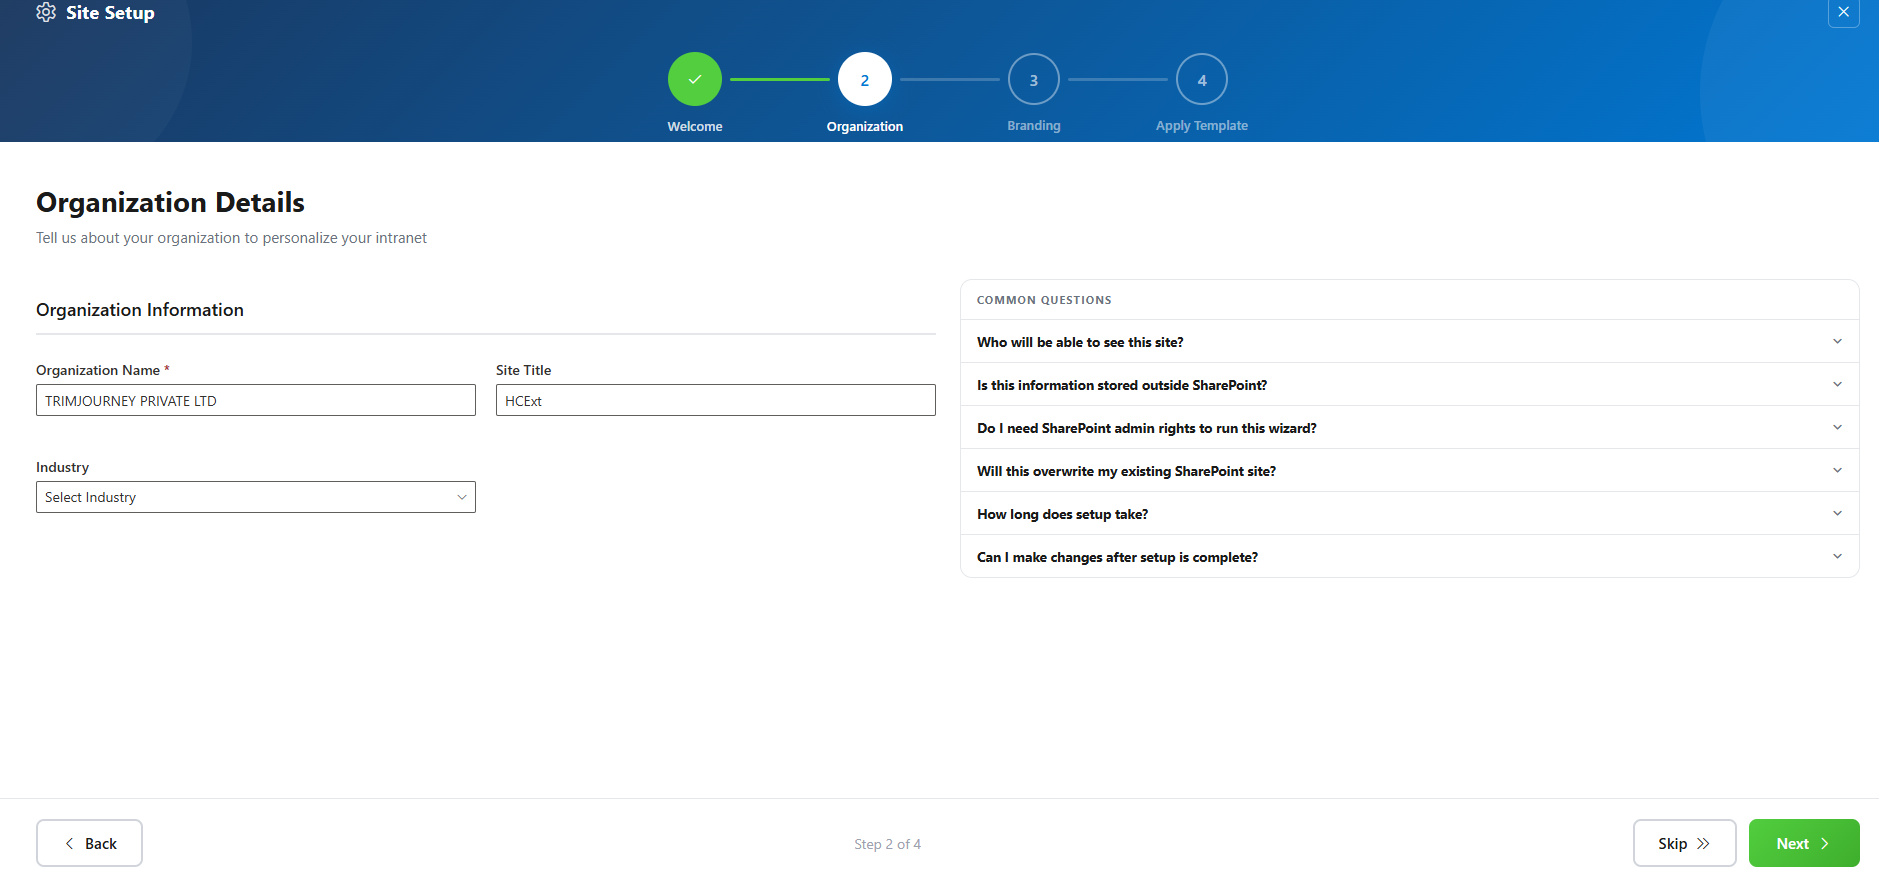
🔹 Step 2: Organization Details
- 1Enter the required Contact Information:- First Name - Last Name
- 2Fill in Company Information:- Company Name - Industry - Number of Employees
- 3Provide additional details:- Vision - Mission
- 4Click Next to continue.
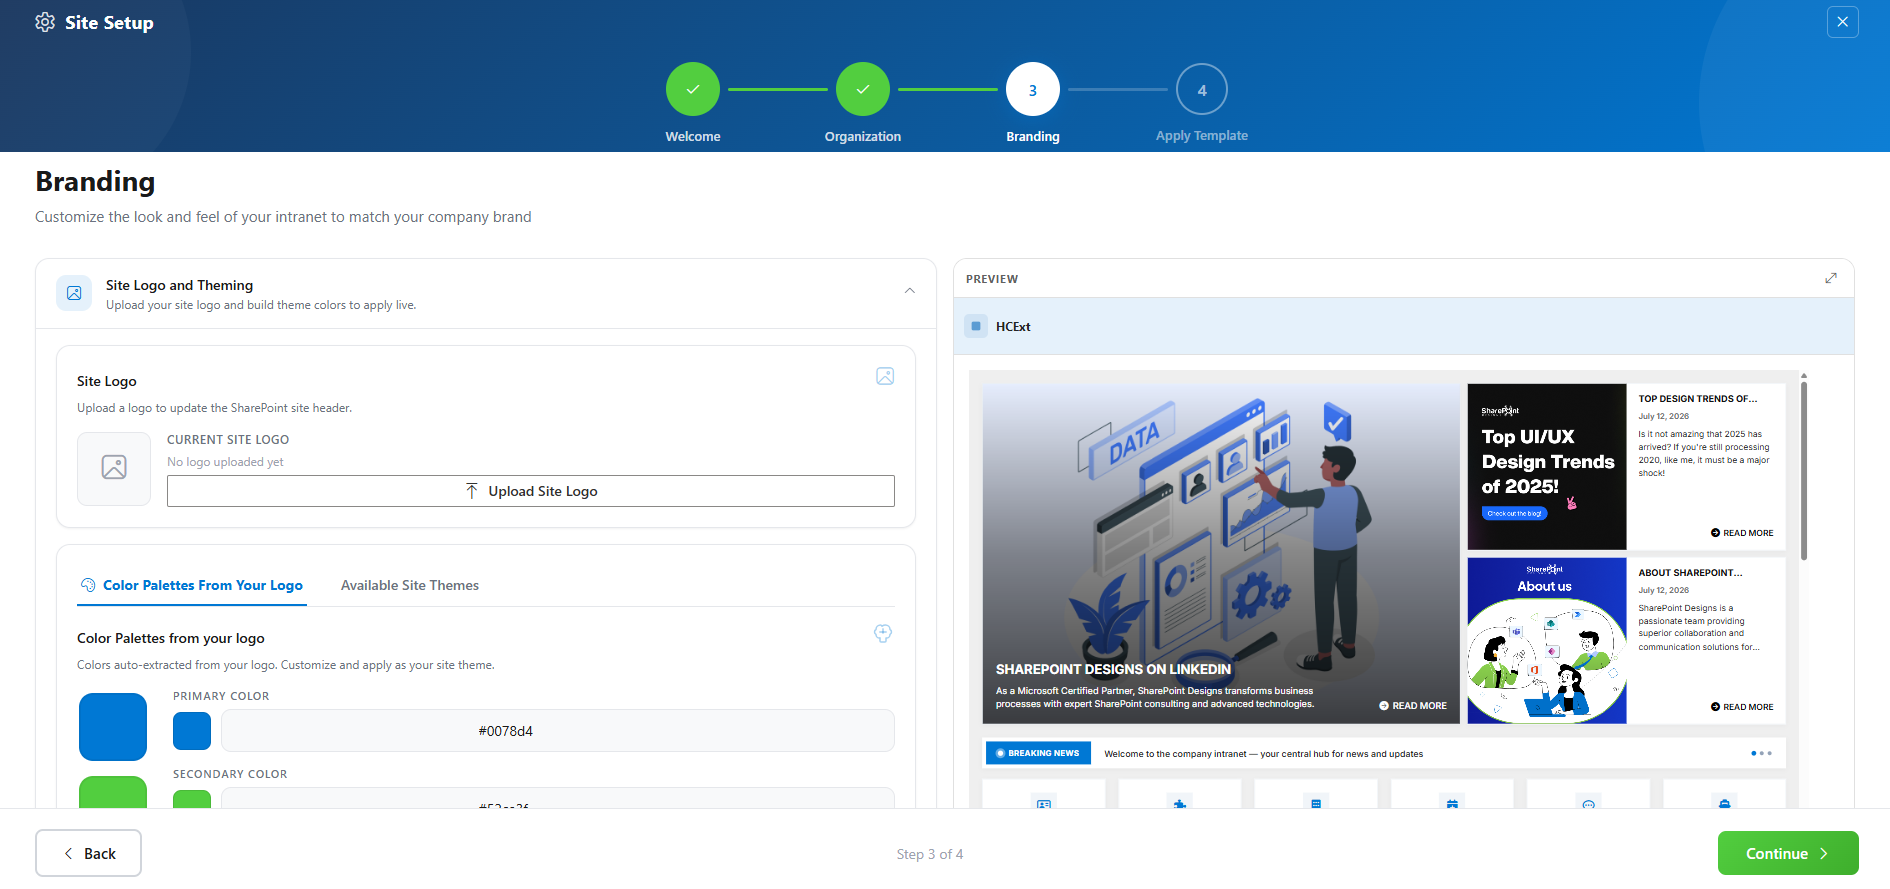
🔹 Step 3: Branding
- 1Upload your Site Logo — Click Upload Site Logo under Site Logo and Theming. Brand colors are automatically extracted from your logo.
- 2Review & adjust theme colors — Edit the extracted primary and secondary colors in the color palette (use the hex fields or color picker), name your theme, then click Apply Theme — or pick an existing theme from Available Site Themes.
- 3 Upload your Favicon — Under Site Favicon, click Upload Favicon to set the icon shown in the browser tab.
- 4 Configure Regional Settings (optional) — Under Regional Settings, click Open Regional Settings to set time zone, locale, and working hours.
- 5 Adjust Appearance Settings (optional) — Under Appearance Settings, fine-tune: Hide Tenant Logo, Hide Site Logo, Hide Site Title, Header Color, Web Part Spacing, Full-Width Page, Footer Alignment, Border Radius, and Font (open Brand Center to manage font packages).
- 6 Preview & continue — Check the Live Preview on the right, then click Continue to move to the next step.
🔹 Step 4: Review Configuration
- 1Review all the configured details:- Organization Details - Branding Settings
- 2Check the What will be created section:- SharePoint Lists - Document Libraries - Home Page - Branding Assets
- 3Click Apply Template to start the setup process.
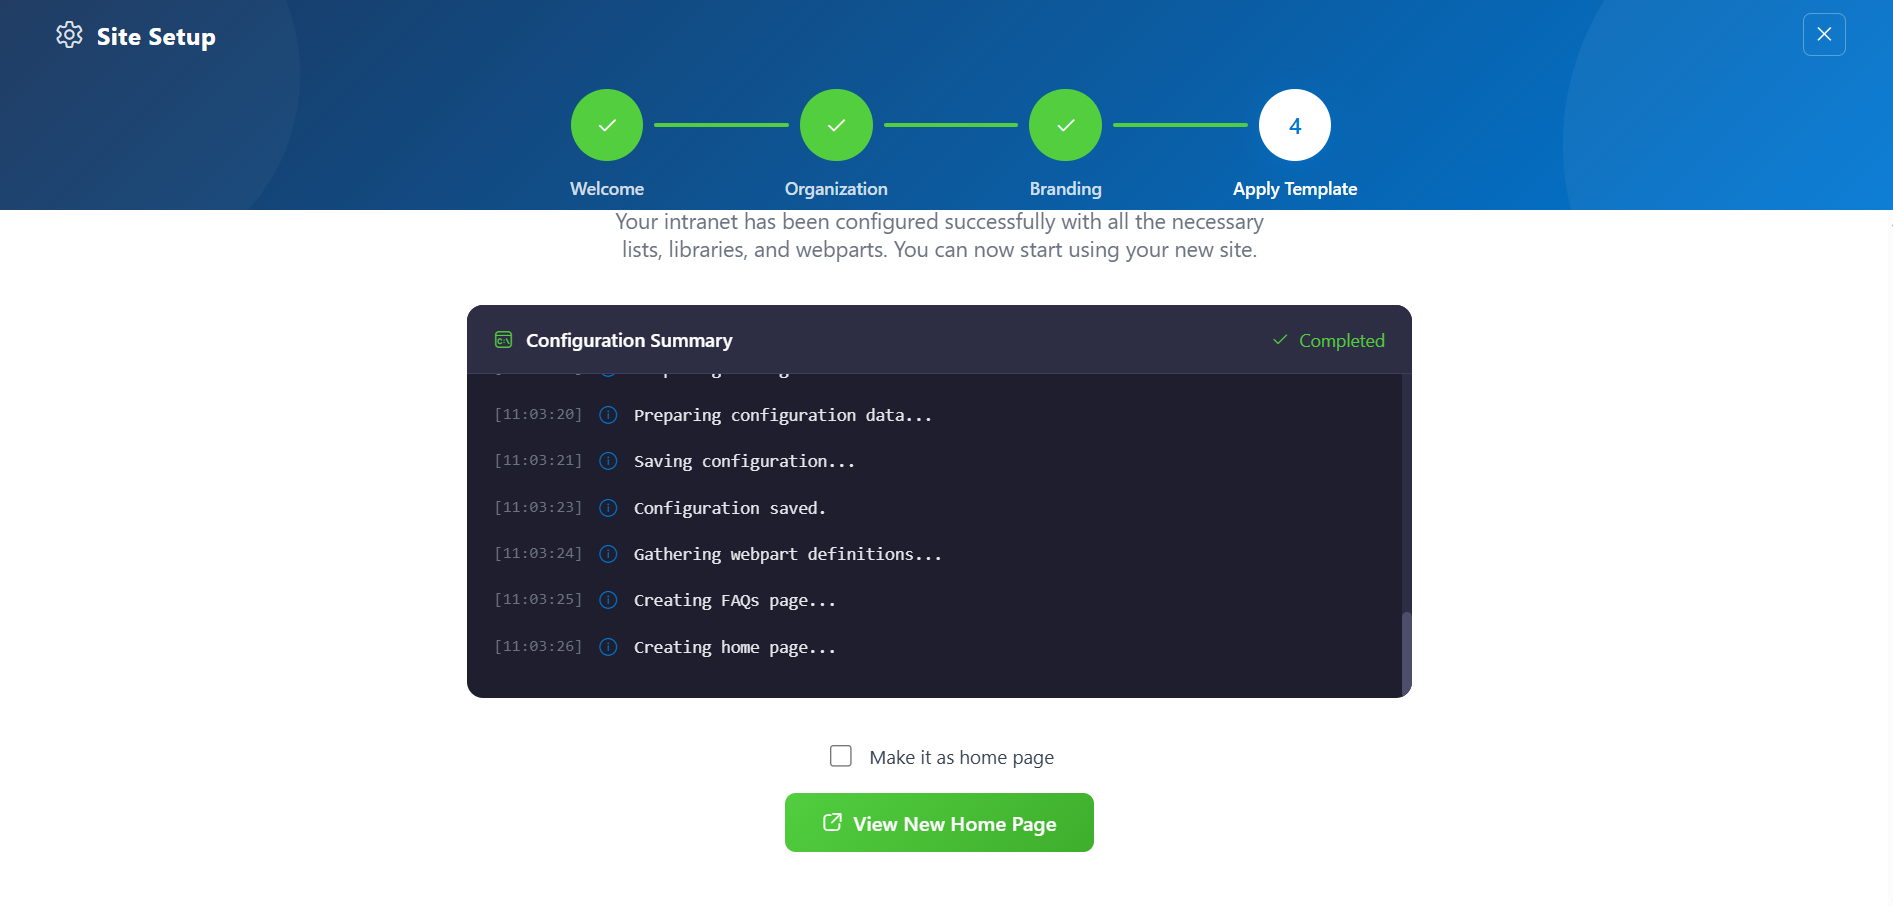
🔹 Step 5: Setup Completion
- 1The system will begin configuring your site and display a Configuration Summary.
- 2You can track:- List creation progress - Library setup - Web part deployment
- 3Once completed, a success message will appear: “Site Setup Complete!”
- 4Click View New Home Page to open your newly created site.
Expected Behaviour🔗
The following resources are provisioned upon applying the Home template:
- 📄FAQs
- 📄Quick Links
- 📄 Tool Links
- Breaking News
Mock data is also auto-added for: No manual configuration required after clicking the Apply template button.
Adding web parts manually🔗
You don't have to use the wizard to use the web parts — each one can be added to any page like any other SharePoint web part.
- 1Edit the page and select + to add a web part.
- 2Search for the web part by name (Featured News, Breaking News, Quick Links, People Search, RSS Feeds, FAQs, or Upcoming Events Calendar).
- 3Add it, then open its property pane to configure it — see the Web Parts Reference for every field.
Reopening the wizard later🔗
The Site Setup Wizard launcher button stays available in the page header after setup completes, so you can reopen it any time to update branding — for example, to swap the logo or theme colors.
🧹 Uninstall Guide
Follow the steps below to uninstall the Intranet Design 1 — Professional SharePoint Intranet app from your SharePoint site:
- 1Go to your SharePoint site and click on Site Contents from the left side navigation or the settings menu.
- 2Find Intranet Design 1 — Professional SharePoint Intranet in the list of installed apps.
- 3Click the three dots (···) next to the app name and select "Remove".
- 4If prompted to switch to the Classic Experience, follow the prompt to proceed.
- 5In the Classic Experience, hover over the app again, click the three dots (···), and then click Remove to finalize the uninstallation.
Troubleshooting common Issue 🔗
Issue: Web Part Not Displaying Correctly
Solution: Ensure that the web part has been added to a modern SharePoint page and that the page has been republished. Check for any missing permissions that might be required for the web part to function correctly.
Issue: Lists or Library Not Created
Solution: Verify that the "Apply template" button was clicked after adding the " Intranet Design 1 — Professional SharePoint Intranet Setup" web part. If the lists/Library are still not created, delete the page and reapply the design.
Issue Missing Demo Items
Solution: Check if the lists items are present in the Site Contents. If the lists are empty, manually add demo items or reapply the design.
Best Practices🔗
Regular Updates
- Keep Content Fresh: Regularly update the content on your SharePoint site to keep it relevant and engaging.
- Monitor Performance: Regularly check the performance of your SharePoint site and make necessary adjustments to improve speed and user experience.
User Training
- Provide Training: Offer training sessions for users to help them understand how to use the SharePoint site effectively.
- Create Documentation: Develop comprehensive documentation to guide users on how to navigate and use the site.
Security Measures
- Implement Security Protocols: Ensure that proper security measures are in place to protect sensitive information.
- Regular Audits: Conduct regular security audits to identify and address potential vulnerabilities.
User Feedback
- Collect Feedback: Regularly collect feedback from users to understand their needs and improve the site accordingly.
- Act on Feedback: Implement changes based on user feedback to enhance the overall user experience.
Collaboration
- Encourage Collaboration: Promote collaboration among team members by providing tools and features that facilitate communication and teamwork.
- Use SharePoint Features: Utilize SharePoint features such as document libraries, lists, and workflows to streamline collaboration and improve productivity.
User Permission 🔗
Stick to the least privilege principle. Review permissions regularly.
Update Package 🔗
For instructions on updating SharePoint packages: 👉 View Update Guide
Support🔗
For help or inquiries, contact SharePoint Designs: 🌐 www.sharepointdesigns.com 📧 support@sharepointdesigns.com