Installation
Installation — Get Started.
⚙️ Installation Instructions🔗
Introduction🔗
This guide walks a SharePoint Administrator through the complete process of installing Sangha Intranet and running the Setup Wizard to deploy a fully configured company intranet.
By the end of this process, your SharePoint site will have:
- A branded homepage and intranet pages
- A structured top navigation
- Configured user roles and permissions
- Automatically created lists, libraries, and content
Approximate setup time: 5-10 minutes, depending on the plan selected and the number of users being configured.
Who should run this guide: A SharePoint Administrator or Global Administrator with access to the SharePoint App Catalog.
What to prepare beforehand:
- Your organization logo file (PNG or SVG recommended)
- Preferred brand colors (hex codes if known)
- A list of users who will be given admin or owner access
- The SharePoint site URL where the intranet will be installed
Prerequisites🔗
Installation Overview🔗
Setting up Sangha Intarnet involves two phases: installing the package, then running the Setup Wizard.
- 1Upload the solution package to the SharePoint App Catalog
- 2Approve required Microsoft 365 permissions
- 3Open the SharePoint site and add the Setup Wizard
- 4Run the six-step guided Setup Wizard
- 5Review the deployed intranet
- 6Complete post-installation checks
Step 1 — Upload the Solution Package🔗
The solution package (.sppkg file) is the installer for Sangha Intranet. It is uploaded to the SharePoint App Catalog, which makes it available across your Microsoft 365 tenant.
How to Upload
- 1Sign in to the Microsoft 365 Admin Center at admin.microsoft.com
- 2In the left navigation, select SharePoint under Admin Centers
- 3In the SharePoint Admin Center, select More features in the left menu
- 4Under Apps, click Open
- 5Click App Catalog — if prompted to create one, follow the on-screen steps
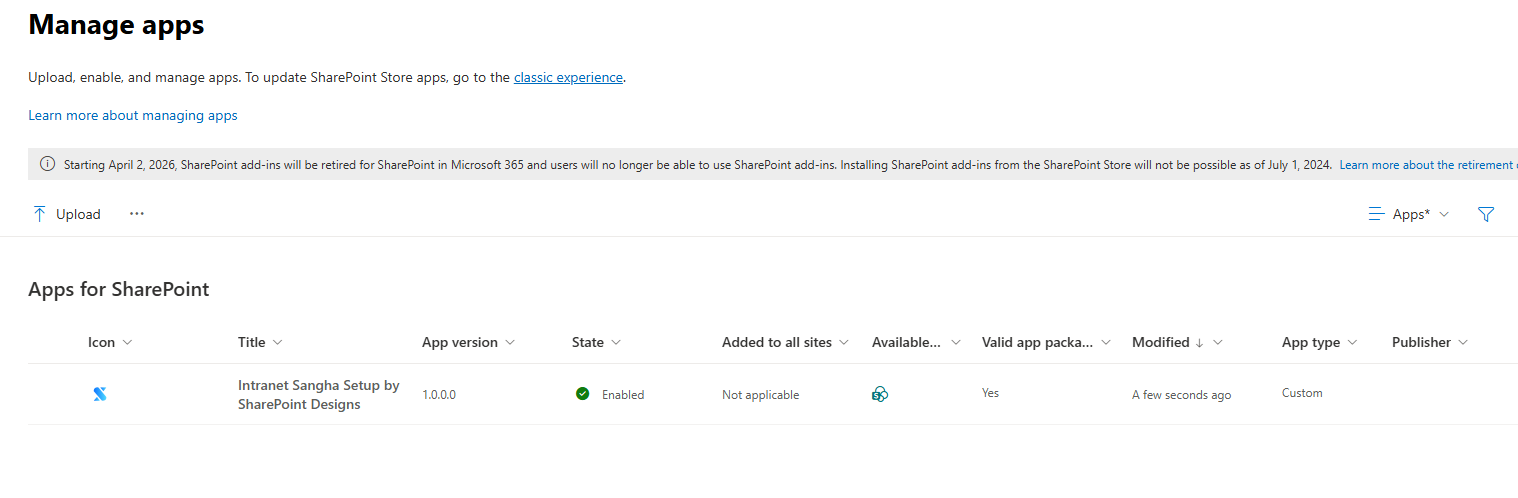
- 6In the App Catalog, click Apps for SharePoint in the left navigation
- 7Click Upload and select the
spd-product-sangha.sppkgfile provided by SharePoint Designs - 8When prompted, review the deployment options:
Deployment Options
- 1Select your preferred deployment option and click Deploy
Why This Step Is Required
The App Catalog is Microsoft's trusted location for SharePoint solutions. Uploading the package here ensures the wizard installs securely and is recognized by SharePoint as an approved solution.
📸 Upload Package
Step 2 — Approve Required Permissions🔗
Sangha Intranet uses one Microsoft 365 permission to read basic organization information during setup. This permission must be approved by an administrator before the Setup Wizard can complete certain steps.
Permissions Required
How to Approve
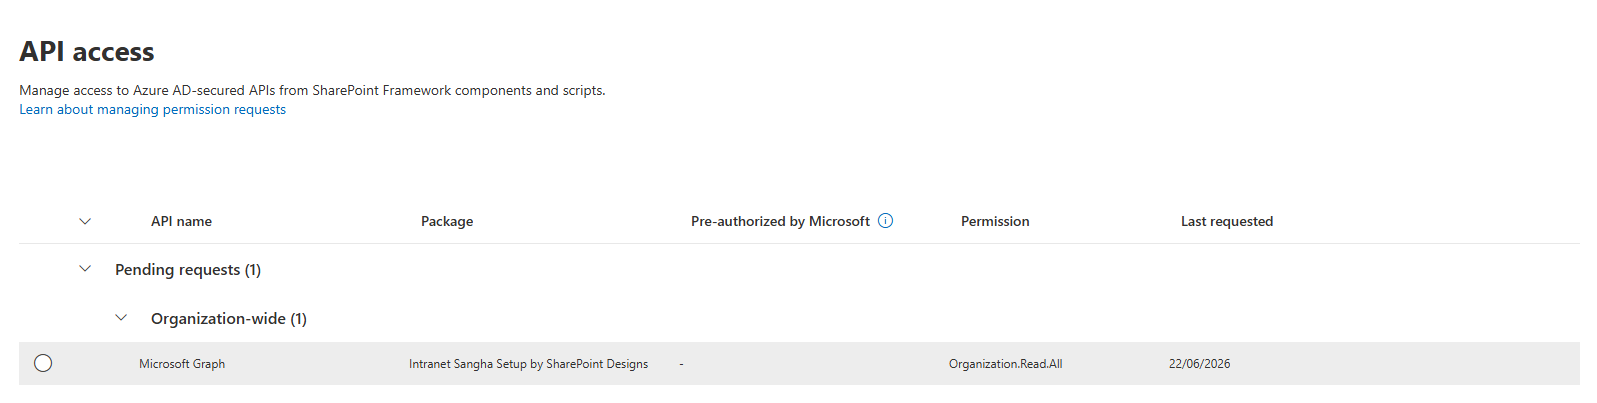
- 1In the SharePoint Admin Center, go to More features → API access
- 2Under Pending approvals, find the request for
Organization.Read.All - 3Select it and click Approve
- 4Confirm the approval in the dialog that appears
What Happens If This Permission Is Not Approved
The Setup Wizard will still run, but the organization name field will not be pre-filled automatically. You can type the organization name manually in Step 2 of the wizard. No other wizard functionality is blocked.
📸 API Permission Approval
Step 3 — Add the Setup Wizard to Your Site🔗
Once the package is deployed, you activate the Setup Wizard on the specific SharePoint site where you want to build the intranet.
How to Add the Setup Wizard
- 1Open the SharePoint site where the intranet will be deployed
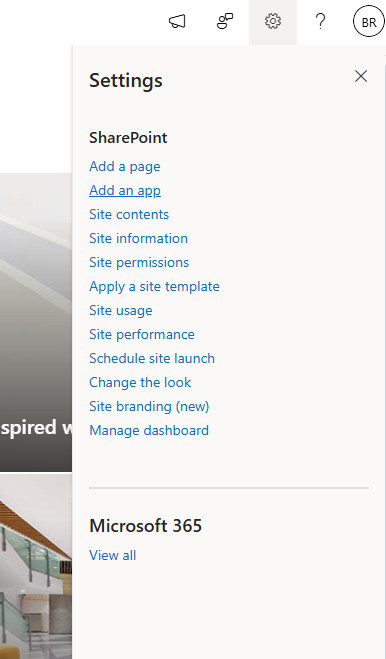
- 2Click the gear icon (Settings) in the top-right corner
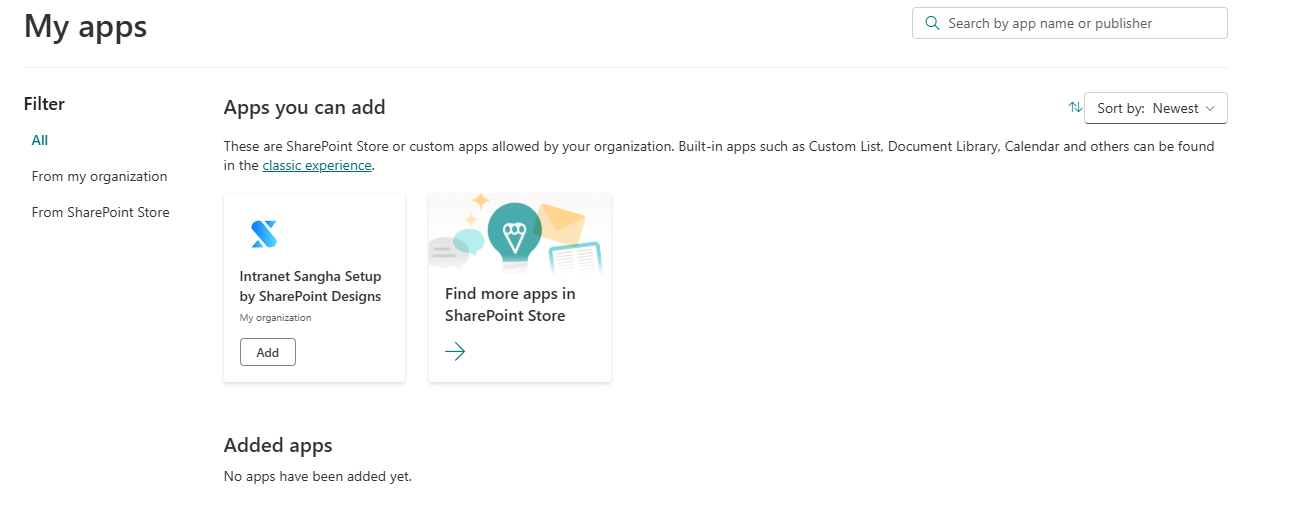
- 3Select Add an app
- 4Search for Sangha Intranet by Sharepoint Designs
- 5Click Add to install it on the site
Once added, the Setup Wizard will appear automatically the next time the site is opened by a Site Collection Administrator.
What Administrators See
The Setup Wizard opens as a full-screen overlay on top of the SharePoint site. It guides you through each configuration step in sequence. Non-administrator users will not see the wizard and will continue to see the standard site.
📸 Settings Gear Icon

📸 Add an app
📸 Setup
Setup Wizard Walkthrough🔗
Step 1 — Welcome & Plan Selection🔗
Purpose
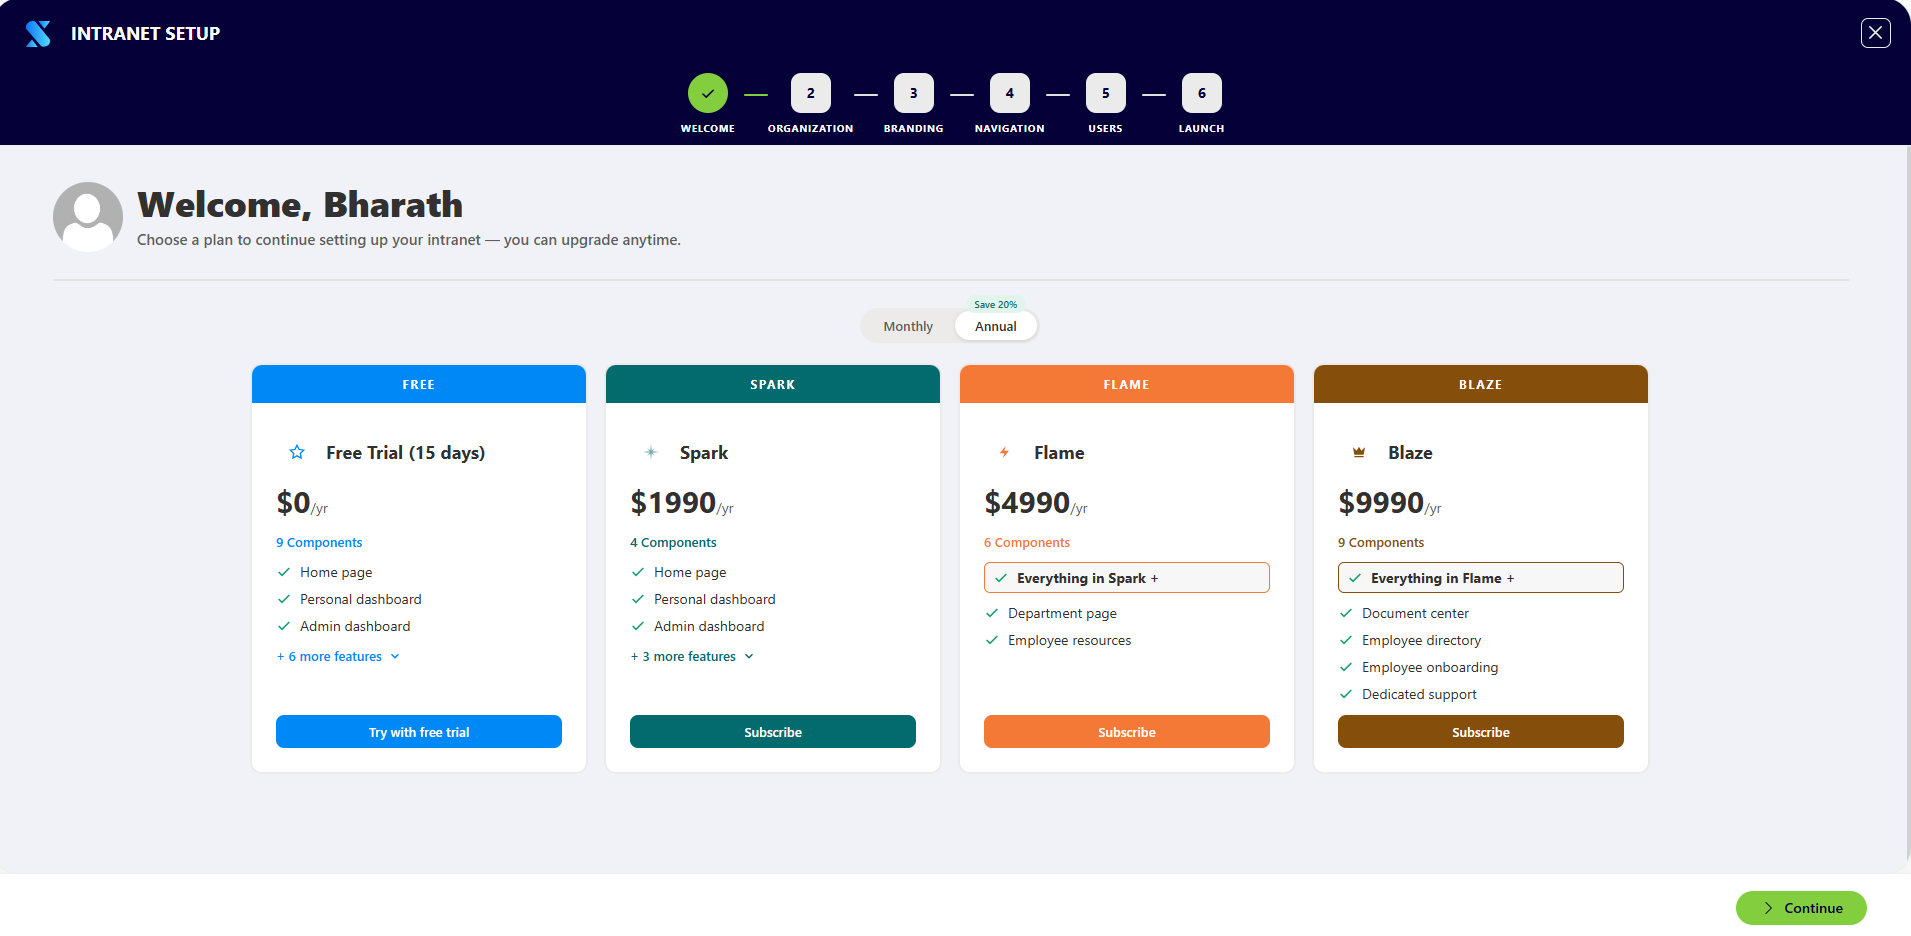
This screen introduces the wizard and allows administrators to select the subscription plan that determines which intranet pages will be deployed.
What Administrators Configure
Review the available plans and activate the one that fits your organization.
Available Plans
What Happens After Completion
The selected plan is validated and saved. The wizard unlocks the remaining steps. If a paid plan is selected, a Stripe checkout window opens to complete payment before proceeding.
Notes
- Annual billing is available for paid plans and offers a discounted rate
- If a previous payment was completed but pages were not fully deployed, a Deploy pending pages button appears to resume from where setup stopped
- The current active plan is shown with a badge if a subscription is already in place
📸 Plan Selection
Step 2 — Organization Details🔗
Purpose
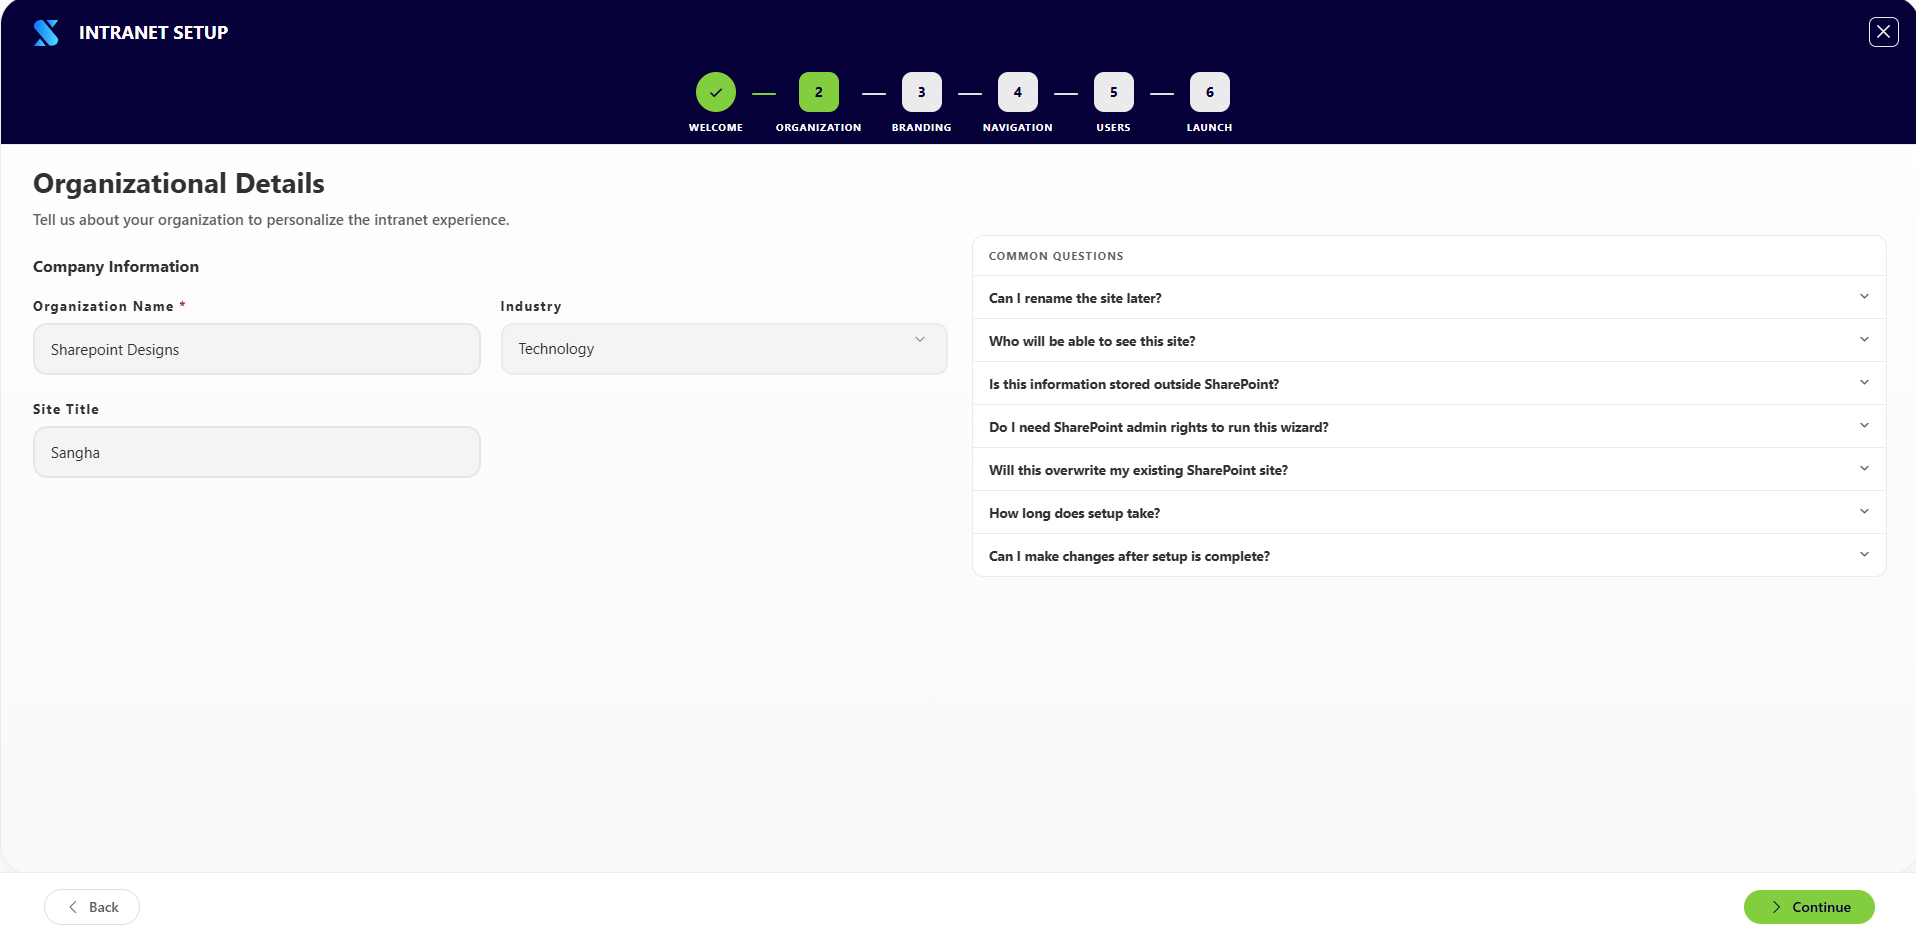
This step personalizes the intranet for your organization by capturing its name, site title, and industry.
What Administrators Configure
Available Industries
Technology, Healthcare, Finance, Education, Manufacturing, Retail, Real Estate, Consulting, Legal, Media & Entertainment, Hospitality, Transportation, Energy, Agriculture, Government, Non-Profit, Other.
What Happens After Completion
The SharePoint site title is updated immediately. Organization name and industry are saved to the setup configuration and referenced throughout later steps.
Notes
- The organization name can be edited at any time by returning to this step
- If the Microsoft Graph permission was not approved, the organization name field will be blank and must be filled in manually
📸 Organization Details
Step 3 — Branding Configuration🔗
Purpose
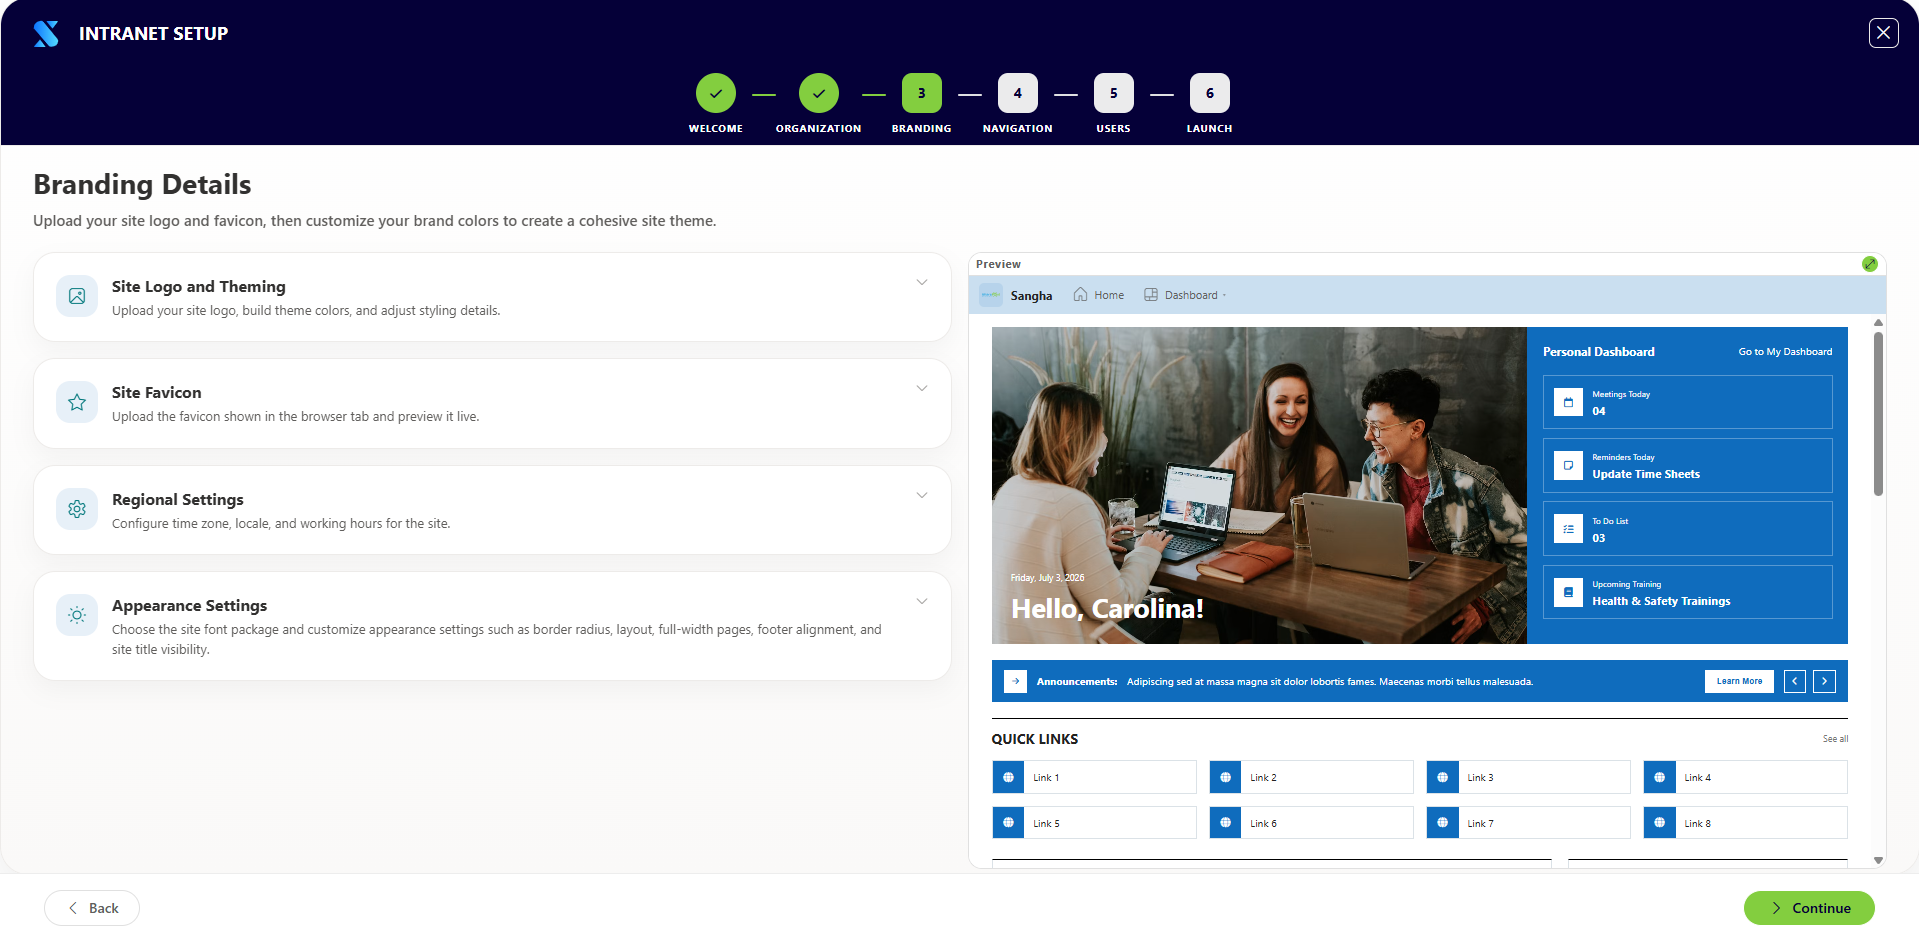
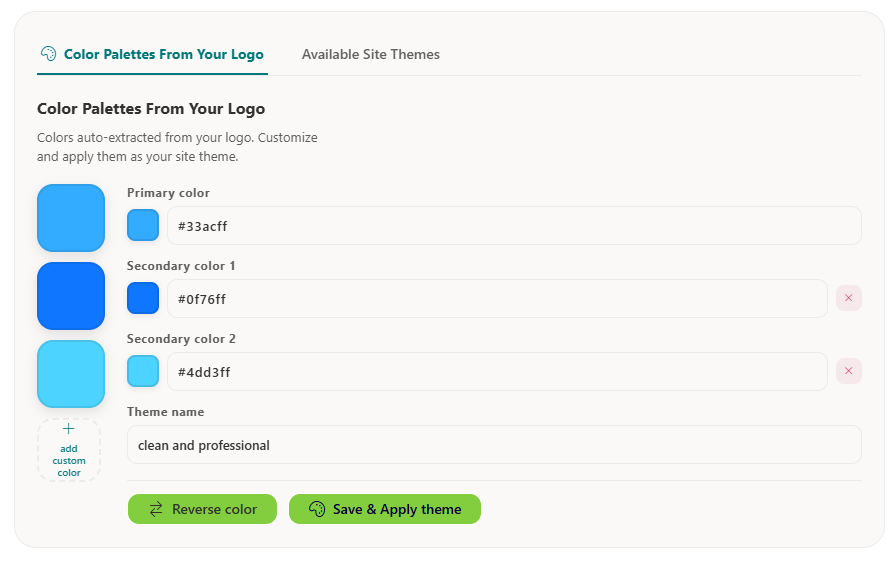
This step applies your organization's visual identity to the intranet — logo, colors, fonts, layout style, and display preferences.
What Administrators Configure
Logo & Colors
When a logo is uploaded, the wizard automatically analyzes it and suggests matching brand colors based on the logo's dominant palette. These suggestions can be accepted or adjusted.
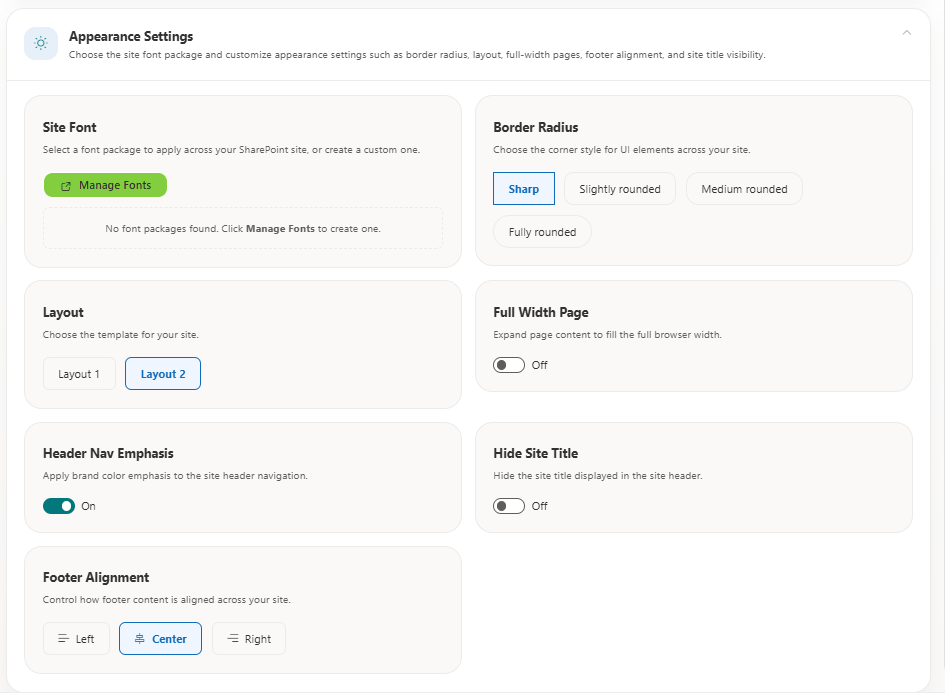
Appearance Settings
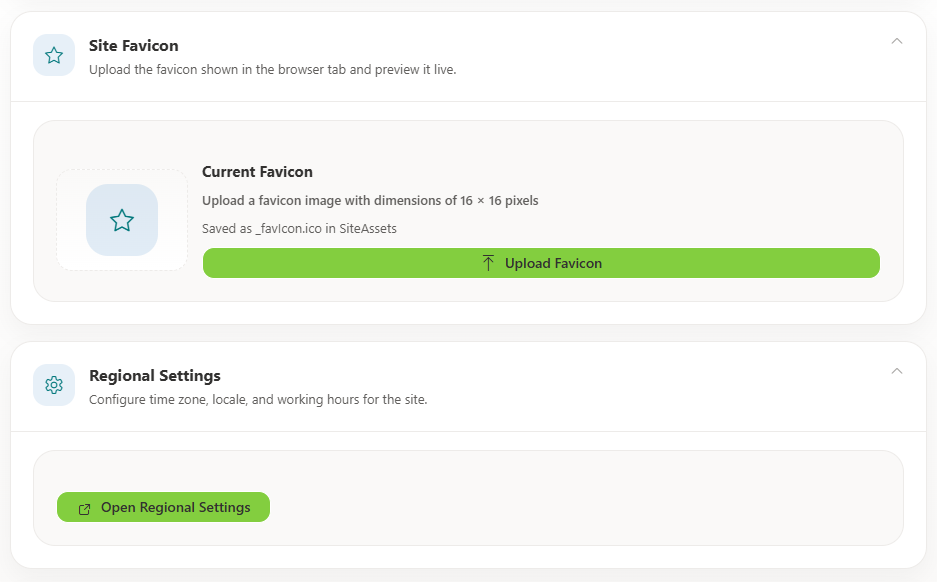
Favicon
Existing Themes
Administrators can also browse and apply existing SharePoint themes (including any previously created Brand Center themes) instead of creating a new one.
What Happens After Completion
- The logo is uploaded to the site's asset library
- A custom SharePoint theme is created and applied using the selected colors
- Font, border radius, theme mode, layout, and footer settings are saved and applied to all pages
- The favicon is applied site-wide
Notes
- All changes show a live preview on the right side of the screen as they are made
- The branding step can be revisited at any time to make adjustments
- Colors can be entered as hex codes or selected using the color picker
📸 Branding Configuration
📸 Site Logo Upload
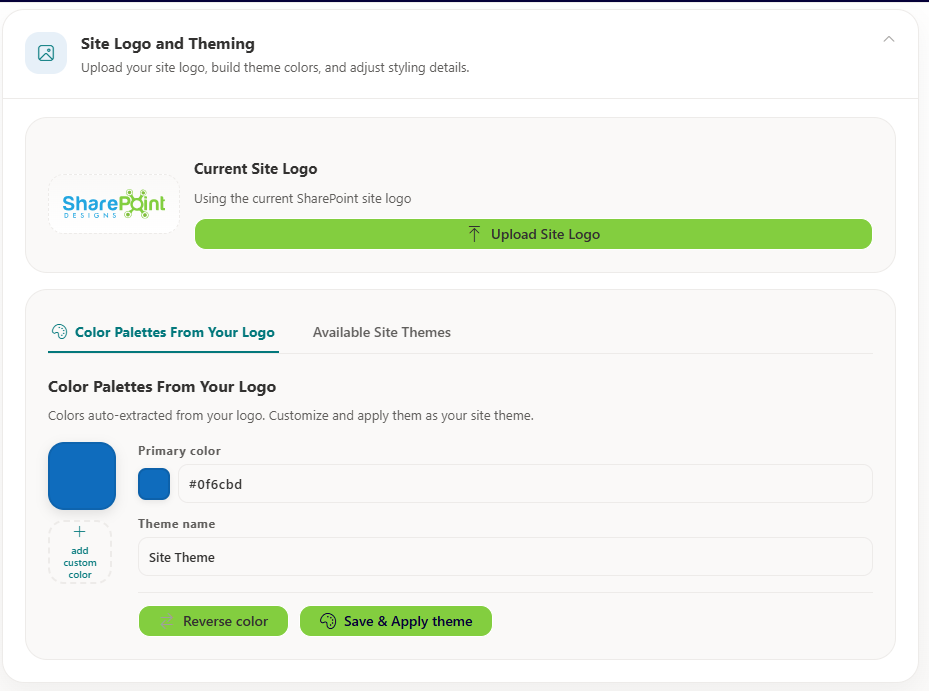
📸 Branding Theme Color Configuration
📸 Branding Favicon & Regional Settings Configuration
📸 Branding Appearance Settings Configuration
Step 4 — Navigation Setup🔗
Purpose
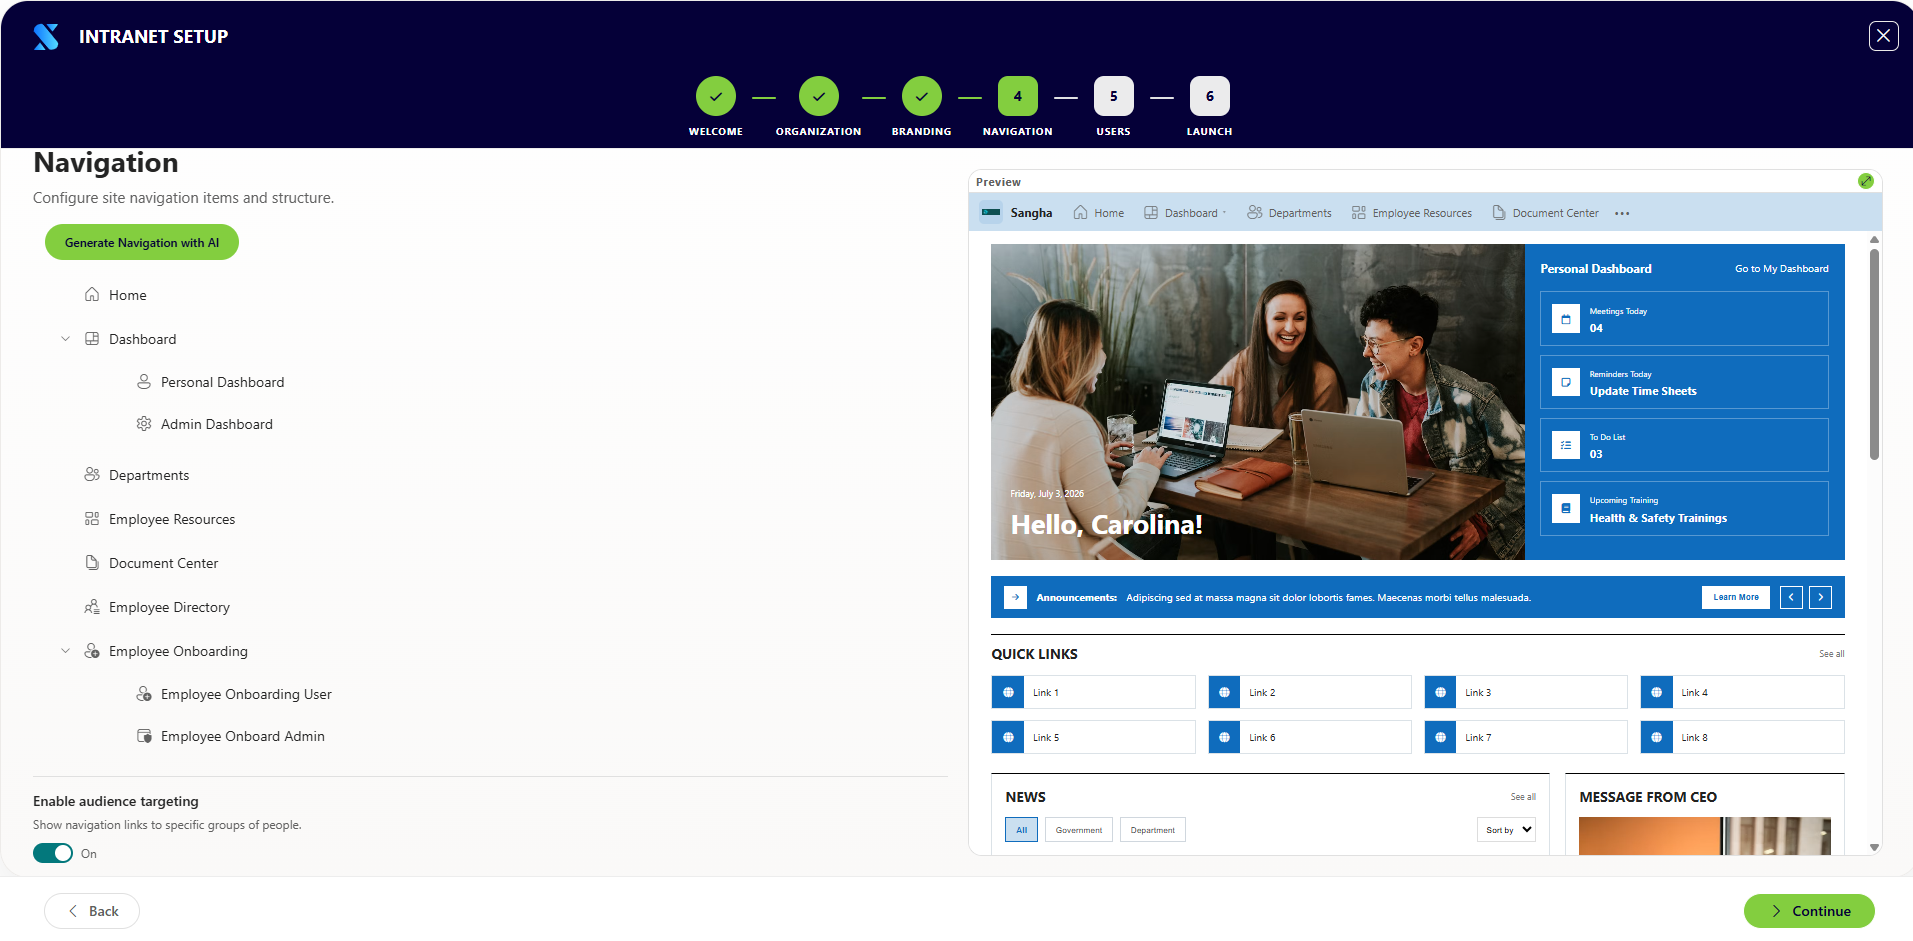
This step builds the top navigation that employees use to move around the intranet. The navigation editor supports multi-level menus, icons, audience targeting, and AI-generated suggestions.
What Administrators Configure
Audience Targeting Options
Navigation items can be shown to everyone, or restricted to:
- Specific Microsoft 365 users or security groups
- Site Admins
- Site Owners
AI Navigation Generation
The wizard includes an option to generate a suggested navigation structure automatically based on your organization type and selected plan pages. This can be used as a starting point and edited further.
What Happens After Completion
The navigation structure is saved to a SharePoint list and applied to the site. The custom navigation web part reads from this list to render the menu for employees.
Notes
- Navigation items can be reordered using drag-and-drop
- Changes are shown in a live preview alongside the navigation editor
- Audience targeting requires that users are signed in to their Microsoft 365 account for targeting to take effect
📸 Navigation Setup Screen
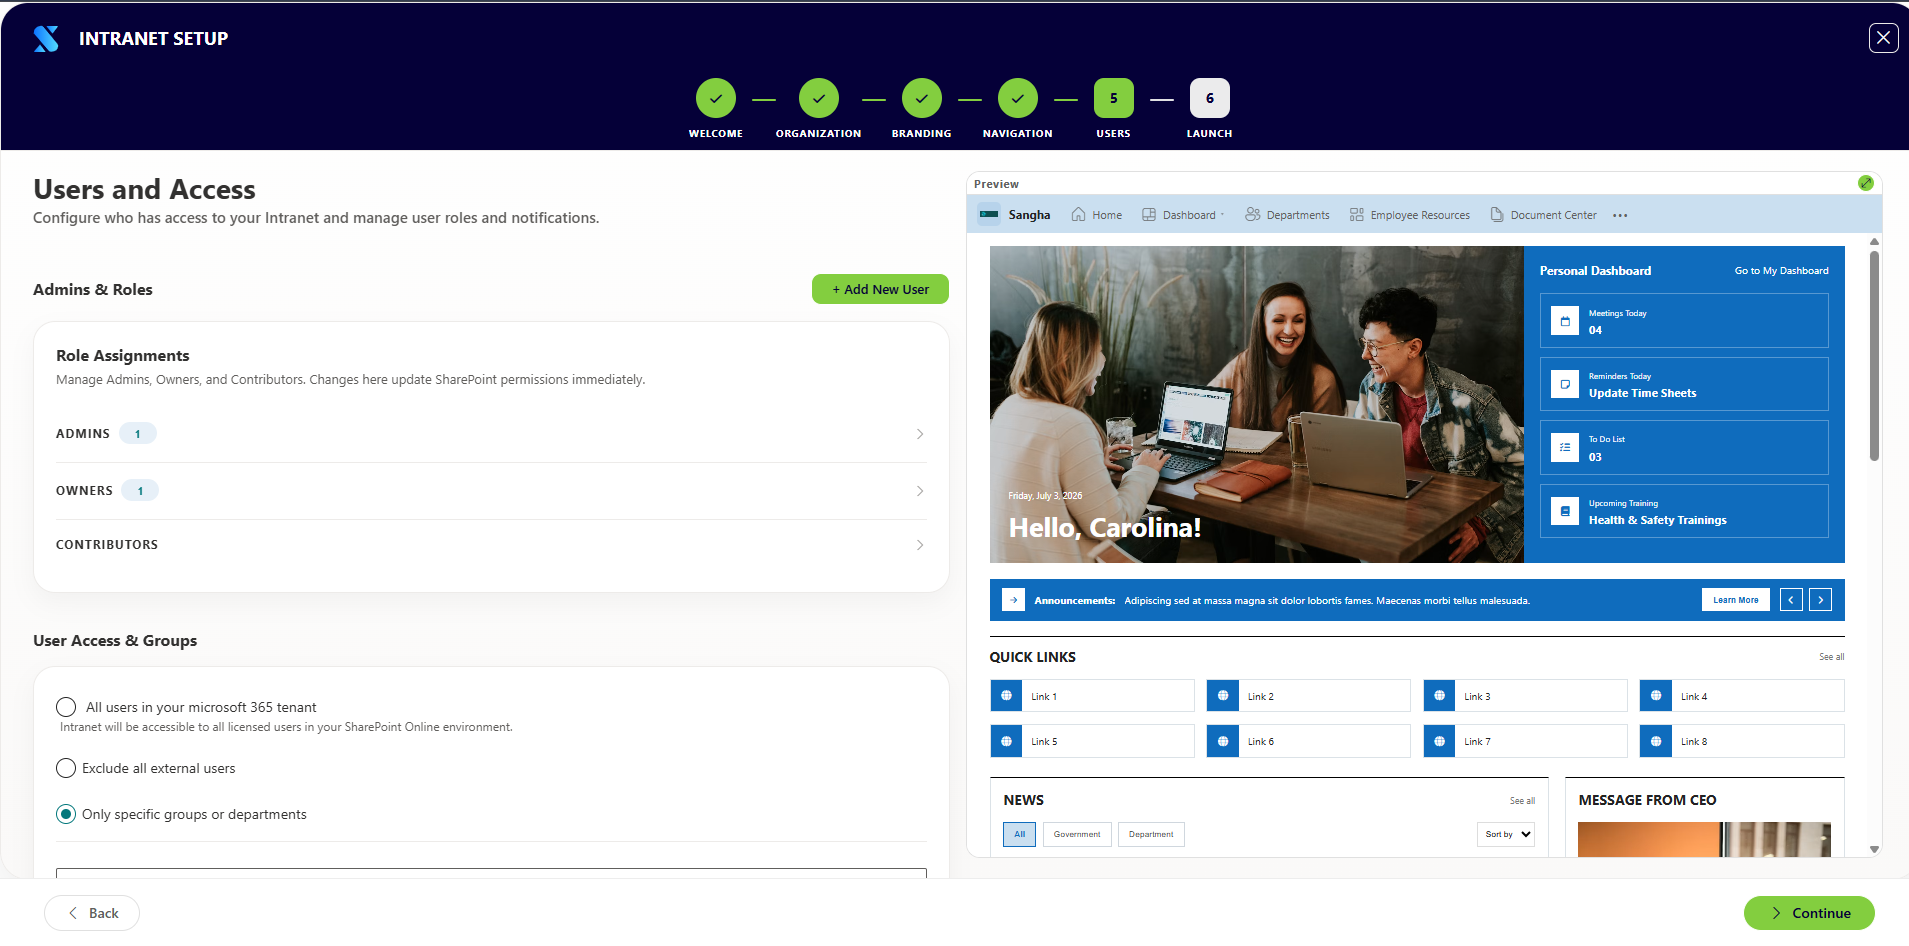
Step 5 — User Access & Permissions🔗
Purpose
This step defines who can access the intranet, assigns user roles, and optionally sends a launch announcement to selected staff.
What Administrators Configure
Access Control Type
User Roles
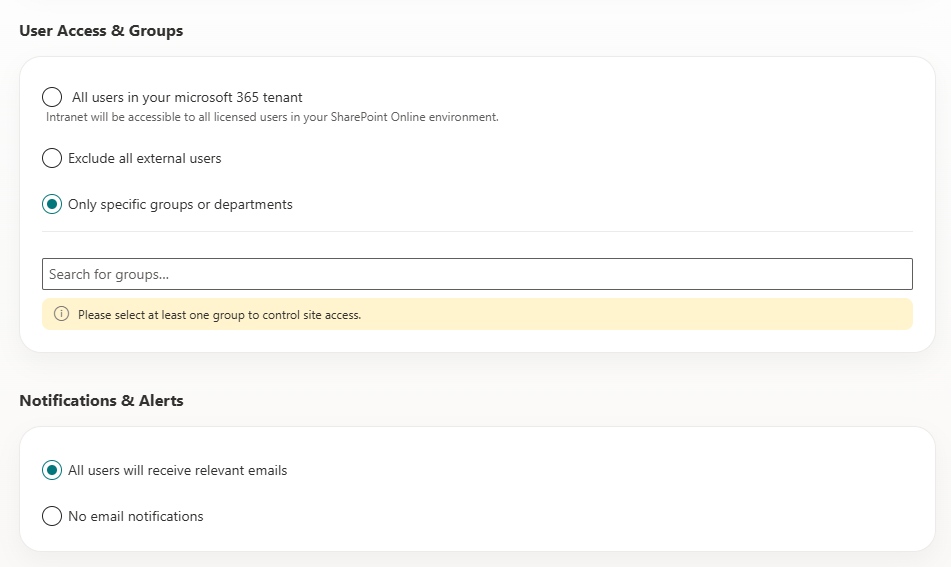
Launch Notification
What Happens After Completion
- SharePoint permission groups are updated with the selected users and roles
- The Visitors group is configured based on the chosen access control type
- If launch notifications are enabled, emails are sent to all listed users after deployment completes
Notes
- Users are searched and selected by name or email address using the people picker
- Multiple users can be added in bulk
- The access control setting can be changed after deployment by returning to this step or through the SharePoint Admin Center
📸 User Access Configuration
📸 User Notification Alerts
Step 6 — Deploy🔗
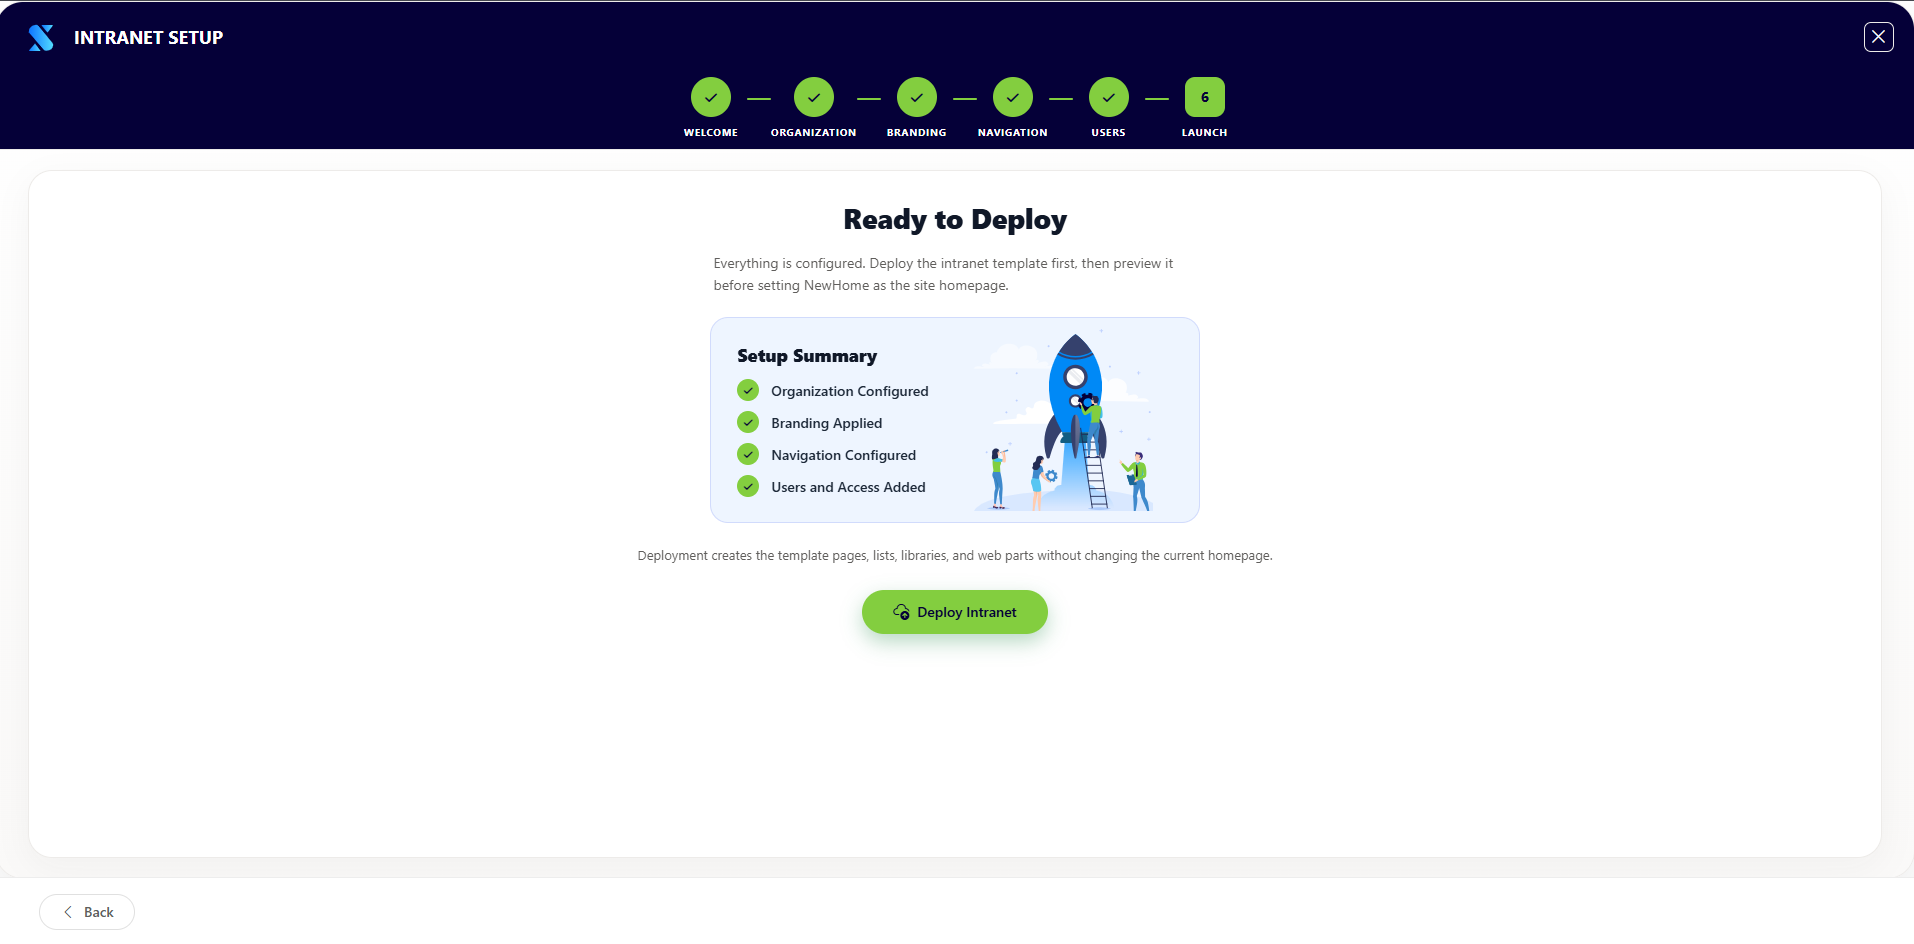
Purpose
This is the final configuration step. The wizard deploys everything configured in the previous steps — creating all SharePoint resources, installing pages, applying branding, and setting permissions.
What Administrators Do
Review the deployment summary and click Deploy to begin.
What the Wizard Deploys Automatically
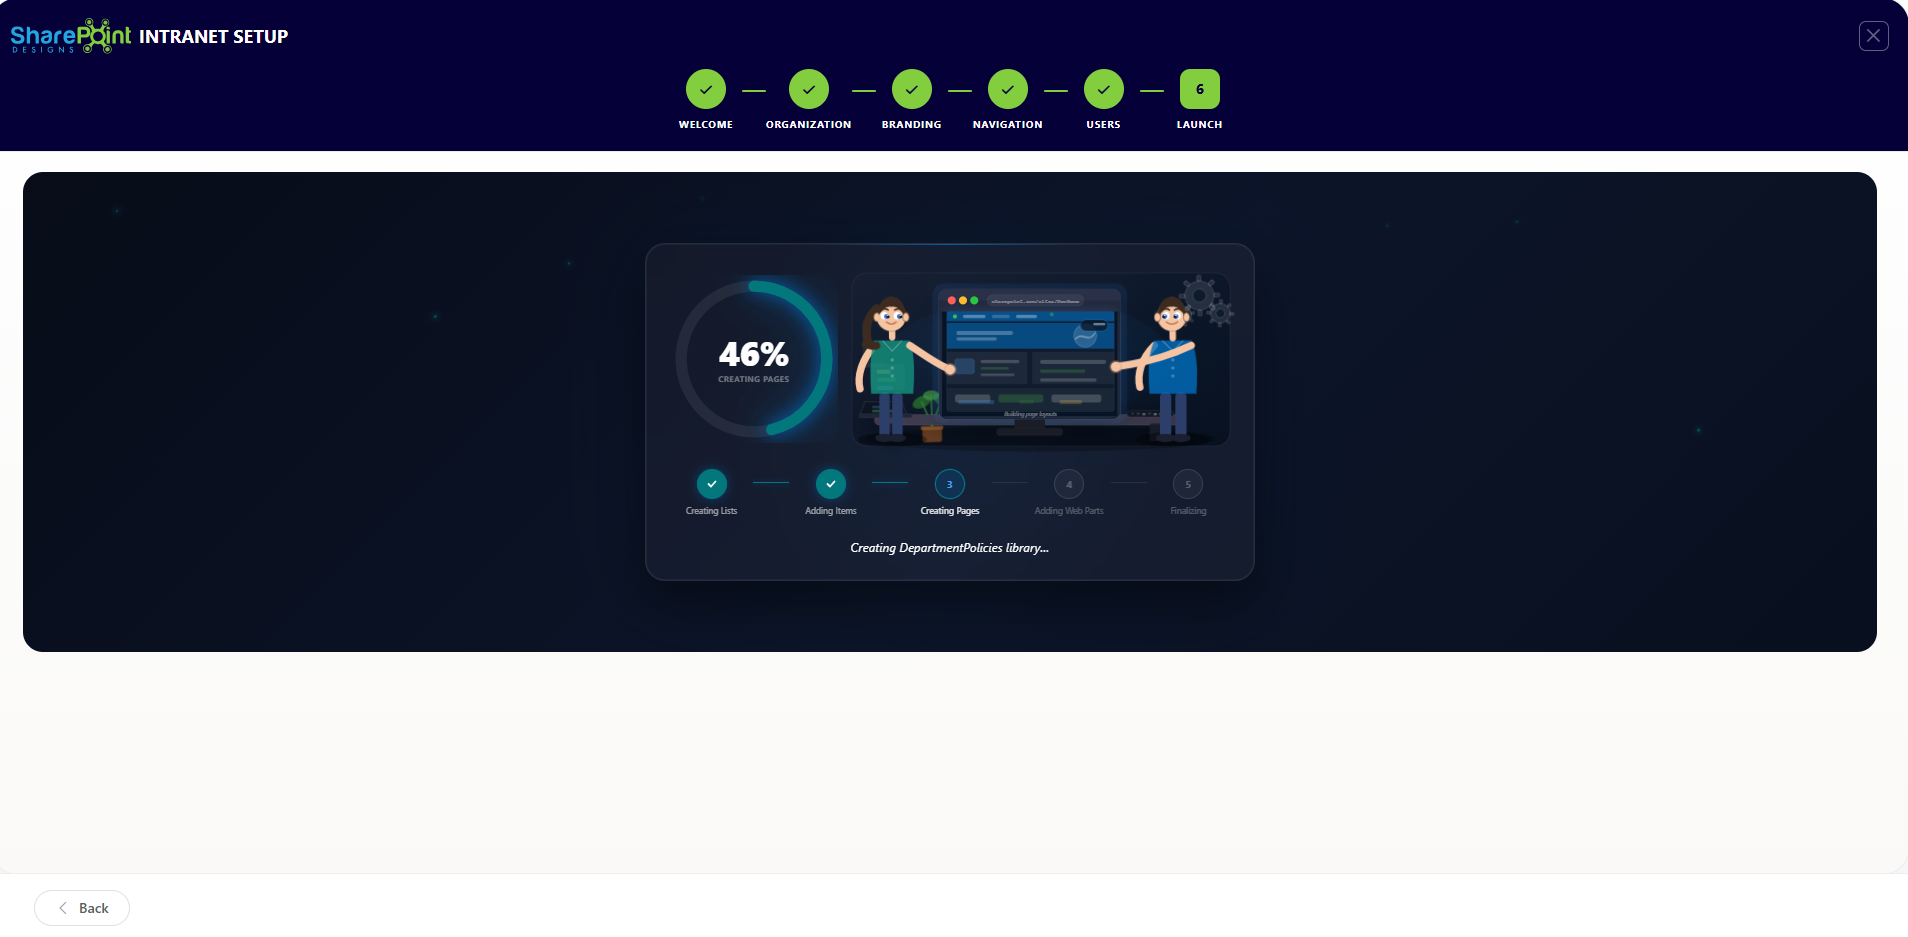
The deployment runs in phases and shows a live progress bar with status messages.
Phase 1 — Lists & Libraries (5–45% progress)
Phase 2 — Configuration (46–50% progress)
- Organization name, logo, branding, and layout settings are applied
- Theme colors are saved to the SharePoint Brand Center
- Font package and appearance preferences are activated
Phase 3 — Page Deployment (51–100% progress)
Each page is created and its web parts installed. Pages deployed depend on the selected plan:
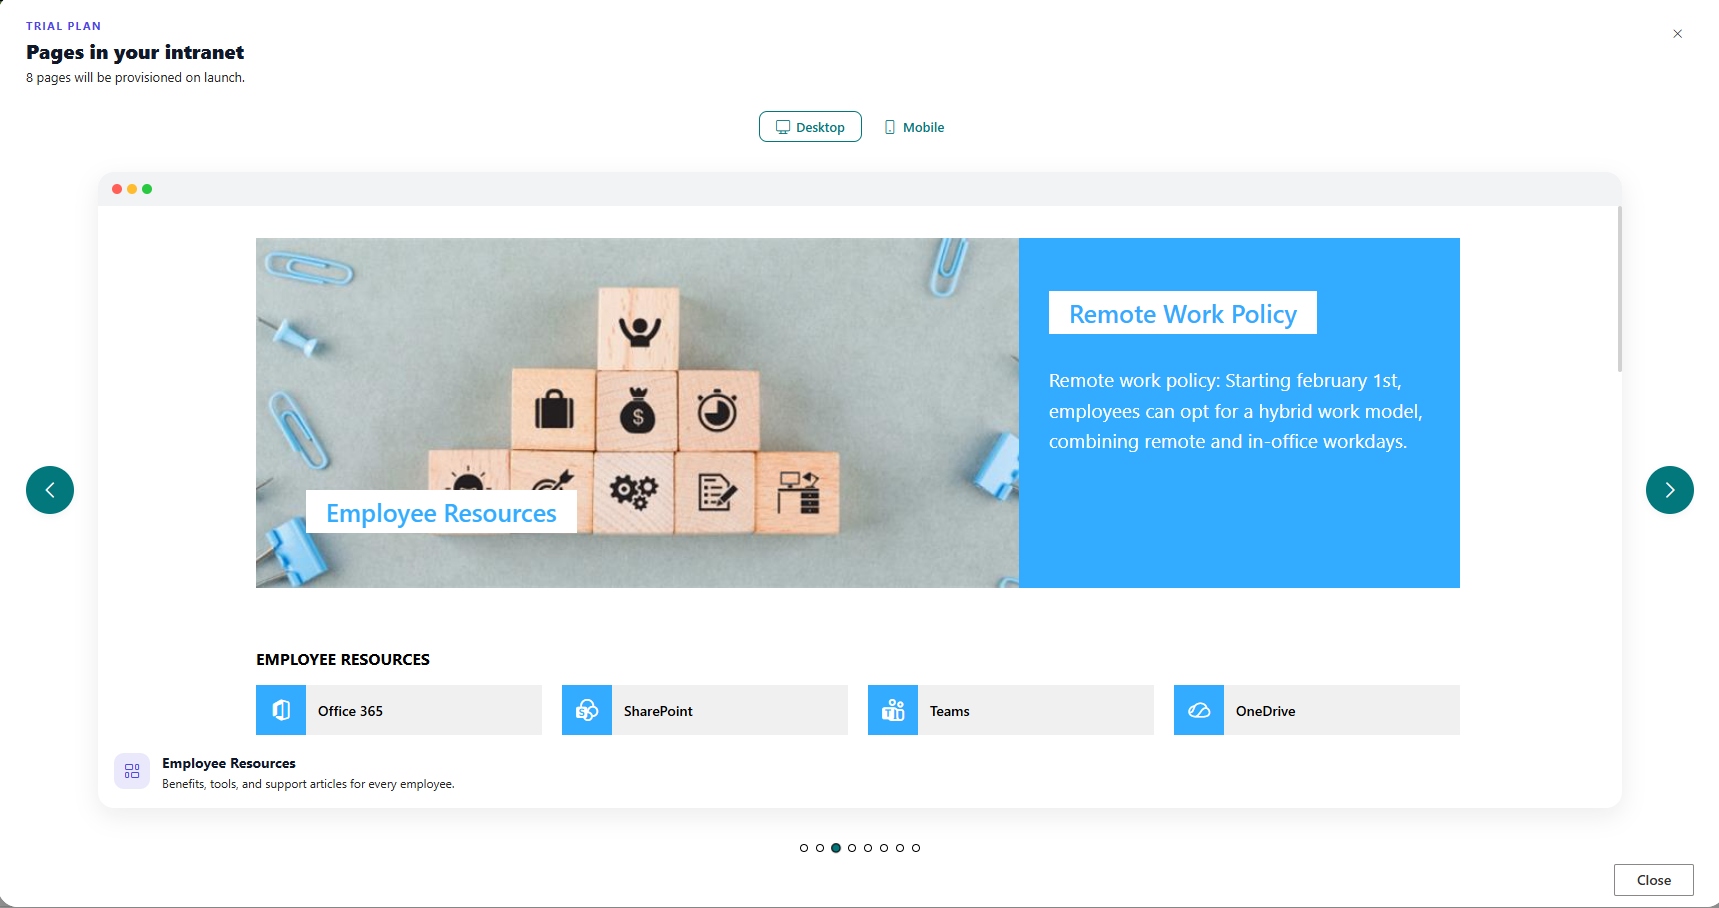
As each page is created, a View [Page Name] button appears so administrators can preview it immediately.
After Deployment Completes
- All pages are live and accessible
- Navigation is published
- User permissions are applied
- Launch notification emails are sent (if enabled)
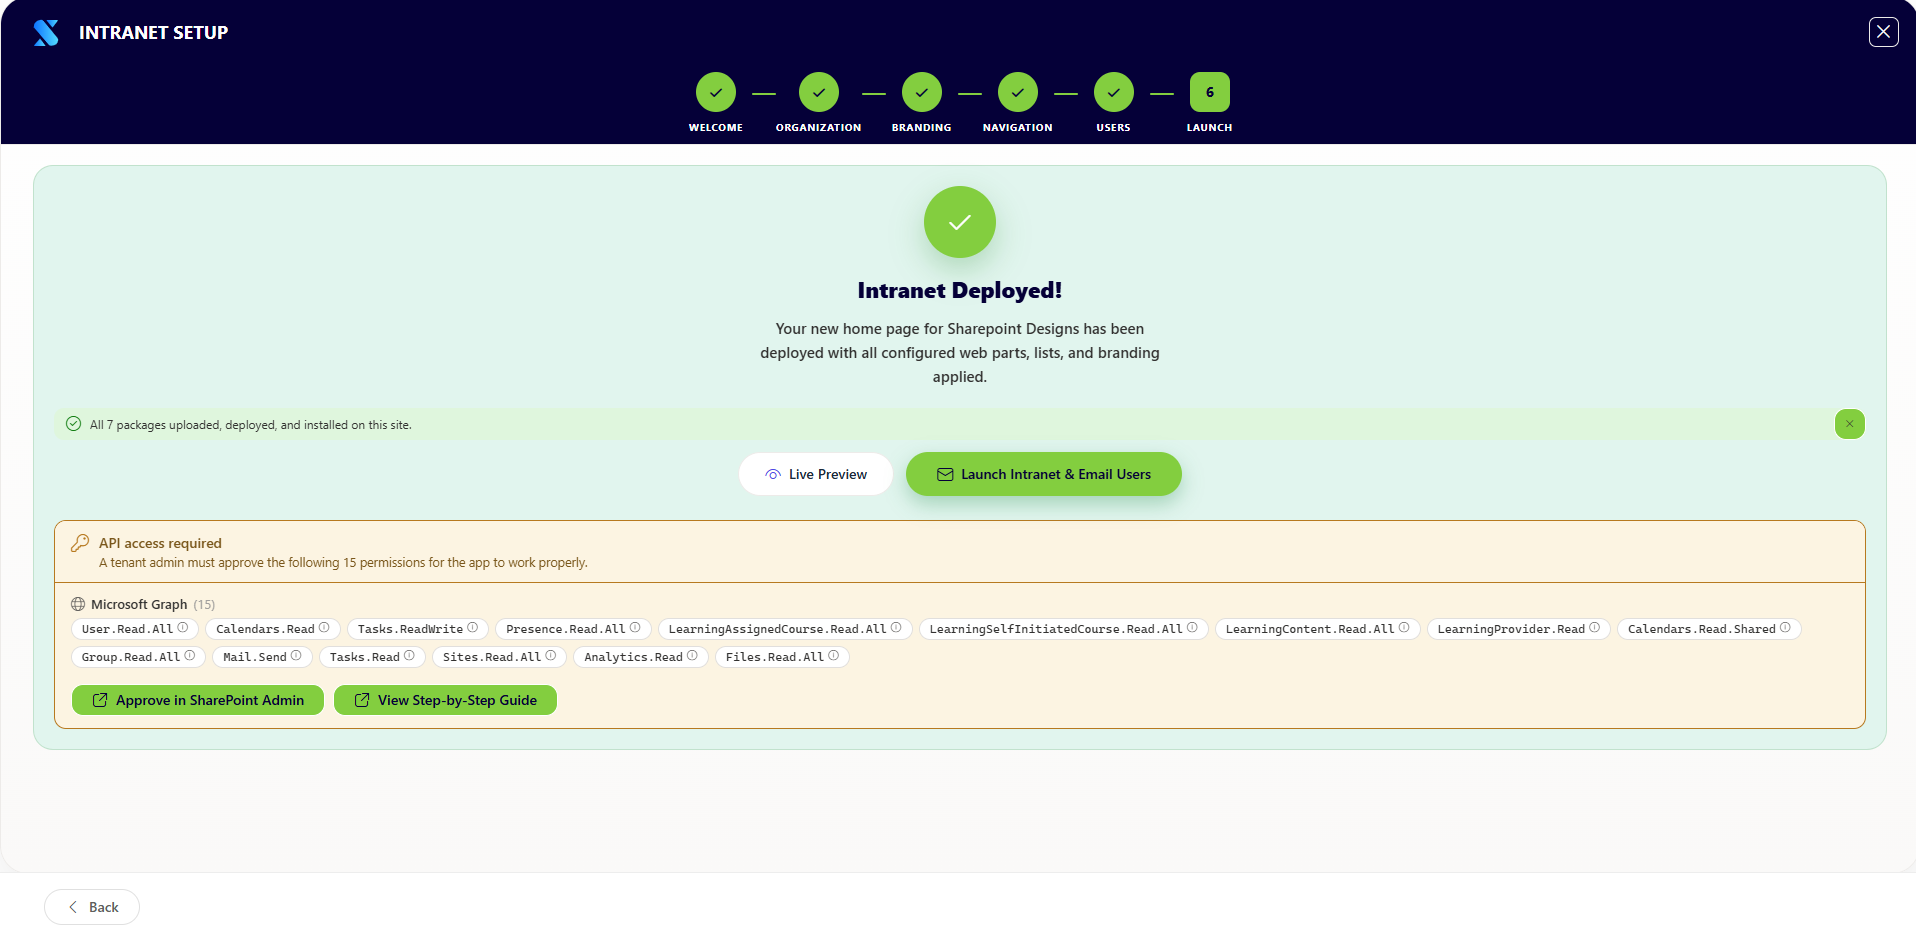
- The wizard shows a completion screen with links to all deployed pages
Notes
- Deployment typically takes 5–15 minutes depending on the plan
- Do not close the browser or navigate away during deployment
- If deployment is interrupted, the wizard can be reopened and will detect which steps were completed; use the Deploy pending pages button on the Welcome screen to resume
- After deployment, any pending API permissions requested by installed web parts will be listed for administrator review
📸 Pre-Deployment Screen
📸 Deployment Progress Screen
📸 Post Deployment Screen
📸 Live Preview
Step 7 — Templates (Post-Launch)🔗
Purpose
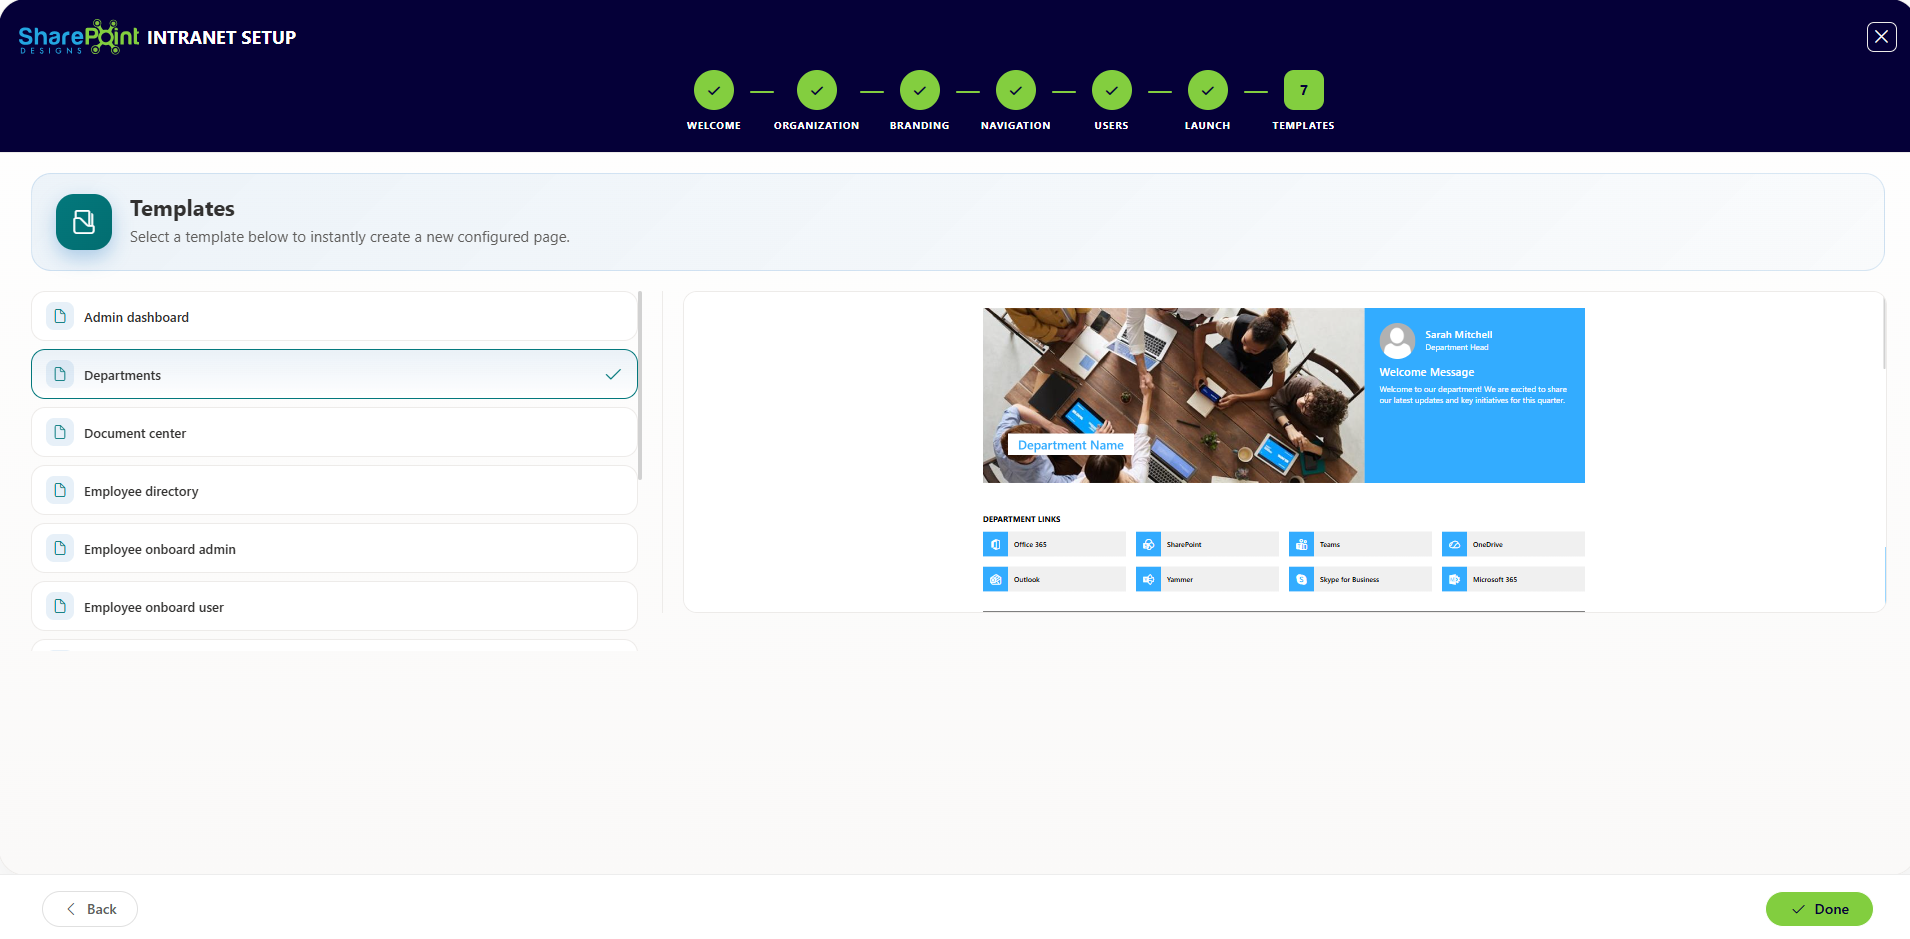
After the initial deployment, administrators can create additional custom pages using pre-built templates from the template gallery.
What Administrators Configure
What Happens After Completion
A new SharePoint page is created from the selected template and added to the site. A link to the newly created page is displayed immediately.
Notes
- There is no limit to the number of pages that can be created from templates
- Created pages are independent and can be edited using standard SharePoint page editing tools
📸 Template Gallery
Troubleshooting🔗
Post-Installation Checklist🔗
Use this checklist after the Setup Wizard completes to confirm the intranet is ready for employees.
- Homepage loads correctly - Open the intranet homepage and confirm content, logo, and layout appear as expected
- Branding is applied - Verify logo, brand colors, and fonts display correctly across all pages
- Navigation works - Click each top navigation item and confirm it links to the correct page
- User access is correct - Sign in as a standard employee and confirm they can access the site
- Permissions are applied - Confirm Admin, Owner, and Contributor users have the correct level of access
- Pages are live - Open each deployed page (Homepage, Dashboard, Departments, etc.) and confirm content is present
- Web parts are functional - Scroll each page and confirm news, events, and other web parts load without errors
- Mobile experience - Open the intranet on a mobile device or resize the browser and confirm the layout is responsive
- API permissions are approved - Check the SharePoint Admin Center API access screen for any pending approvals from installed web parts
- Launch email delivered - Confirm launch notification emails were received by the users added in Step 5